Ikea Hack: DIY Copper-Galvanized Planter Pots
Who doesn't honey a fast and easy DIY project that involves an IKEA hack? Respond: Nobody. Anybody loves that kind of thing. Which is why you're going to love this project, which can be done in an afternoon, including drying fourth dimension. The end result? A chic pair of copper-galvanized planter pots for virtually whatsoever space.
 View in gallery
  View in gallery
 And so grab your current light summertime reading material and a lounge chair, because the bulk of your "DIY" time volition be spent in utmost relaxation.
 View in gallery
 DIY Level: Piece of cake/beginner
 View in gallery
 Materials Needed:
- Two (2) Ikea sockergalvanized planter pots
- Drill + drill bit advisable for drilling through metal
- I (one) tin can of Krylon metallic foil spray paint in copper (or the metallic of your choice; y'all won't need a full tin)
- Plastic grocery bag or scrap newspaper
- Painters' tape
- Two (2) quart-sized plants of your choice, not shown
 View in gallery
 Anytime you plant a live plant, in that location needs to be appropriate water drainage in the container. The socker pots don't come with this feature, about likely because Ikea offers a variety of fake plants that work well in these pots. Which, if you adopt that route, are a great alternative! Only you need to drill drainage holes otherwise.
 View in gallery
 Three or four large holes per pot will be sufficient.
 View in gallery
 After ensuring your pots are clean and dry out, it's time to prep them for paint. Accept a plastic grocery handbag, and put it over the height portion of one of your pots. Determine where you want the copper-metal line to be. This example shows about halfway upwards the pot.
 View in gallery
 Keeping the bag in place, tape the bag downwards while y'all tape a straight line around the pot. Socker pots are nice because you can merely follow one of the grooves already at that place. Be sure that the pocketbook doesn't interfere with the painting-border of the tape; keep the bag on 1 half of the tape, and use the tape'southward stickiness to secure the edge to the pot on the other half. Tip: Wide painter'due south record works all-time for this.
 View in gallery
 When the tape is placed and the line is straight, run your fingernail along the painting-border to seal it in place and minimize pigment leaks or runs.
 View in gallery
 Your beginning pot is fix to go. This i will have copper on the lesser.
 View in gallery
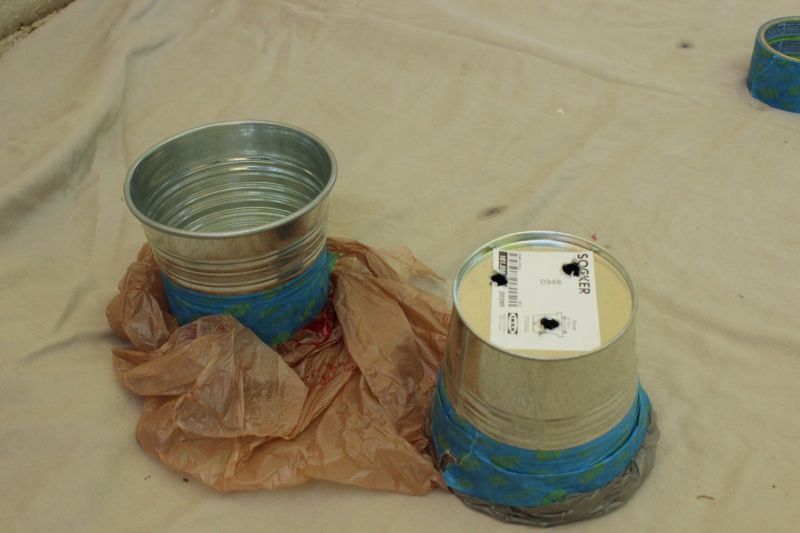
 Take your second socker pot in hand, and place a plastic grocery handbag effectually the lesser of the pot. Fold or double upward the bag and then that it wraps around the pot snugly.
 View in gallery
 Decide the line you want your copper-metal joint to be. This instance shows both pots coming together at exactly the aforementioned line. Tape the pocketbook in identify and the painting-line securely.
 View in gallery
 Place both pots plastic grocery handbag-side down onto a paint protective surface, like an sometime sheet.
 View in gallery
 Milkshake upwards your tin of Krylon metallic foil spray paint. This stuff is as good equally its proper name would suggest, every bit far as creating a truly metallic sheen on any surface you're painting. When yous're painting a shiny galvanized pot, I call back information technology's a beautiful combination to have an equally shiny metallic look on the other one-half.
 View in gallery
 The play a trick on to making the Krylon metallic foil paint expect dandy is several very light coats of paint. Don't endeavour to do total coverage on the first round. Expect a few minutes between each light glaze, and hit it again with some other light glaze until the coverage is solid. This is critical to prevent runs and streaks.
 View in gallery
 On the pot with the exposed elevation side, exist sure to paint the inside third of the pot likewise. You don't need to do the unabridged inside, though, considering this will be covered with dirt.
 View in gallery
 Also, because the socker pots have a lip around the upper border, it's a good idea to look at them from all angles, such as from below, and touch up any missed spots. For instance, I idea I was done, until I got on my hands and knees and looked upward on the pots and saw this thin stripe of metal showing through under the lip.
 View in gallery
 Afterward you've ensured that the exposed metal has been sufficiently spray painted, information technology's fourth dimension to carefully pare off your painter's tape before the paint dries.
 View in gallery
 Removing tape at this indicate minimizes peeling or cracking of paint during tape removal, as opposed to if yous wait until paint is dry.
 View in gallery
 Pull the plastic sacks away from the pots carefully also, so you don't smear any of the wet pigment that's on them dorsum onto your unpainted side of the pots.
 View in gallery
 Allow your pots dry out thoroughly.
 View in gallery
 After the pots are dry, plant your plants of option with potting soil or potting mix. Place them on a clear plastic water protector then the vented water won't impairment your piece of furniture.
 View in gallery
 The two plants used in this case are sansevieria and hobbit succulent. Both are dandy indoor plants, in my experience, and are quite forgiving.
 View in gallery
 This is a fun still chic style to customize those Ikea pots – truly a perfect summer DIY project. It'due south a breeze to practise and satisfying to look at when information technology'southward done.
 View in gallery
 The particular of copper on opposing ends of the pair of galvanized pots is subtle (due to similar sheens) yet distinct (due to unlike metallics).
 View in gallery
 You can get totally creative with this concept, of course. You could angle your paint line, split up it to 1/3 and 2/iii, choose 2 colors instead, really the possibilities are limitless. Have fun with it equally you make information technology your ain!
Source: https://www.homedit.com/copper-galvanized-planter-pots/
Post a Comment for "Ikea Hack: DIY Copper-Galvanized Planter Pots"